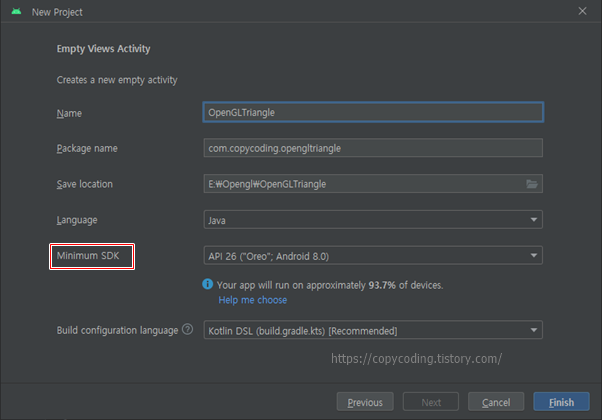
Android에서 OpenGL ES 3.0 버전을 이용하여 사각형을 그리는 예제입니다.

Google developer 사이트에서 OPenGL을 이용하여 Android에서 삼각형과 사각형 도형을 그리기 위한 설명을 하는 페이지를 간단히 요약하여 소개하고 제공하는 소스를 이용하여 도형을 제작하는 방법까지 바로 이전 글에서 삼각형 관련된 예제로 알아보았습니다.


Android OpenGL ES 3.0
삼각형 그리기(java 버전)


그래서 자세한 설명은 이전 글을 참고하시기 바라며 이번에는 동일한 소스를 사용하여 사각형을 그리는 부분만 추가하여 테스트를 진행합니다.

삼각형을 그릴때는 Triangle.java 파일 만들었는데 사각형을 그리기 위해서 Square.java 파일을 생성하는데 일부 변경이 되고 Renderer 파일도 조금 수정해주면 됩니다.


다른 소스는 전에 생성한 내용을 그대로 사용하고 여기서는 SquareRenderer 파일의 변경된 부분만 설명합니다.


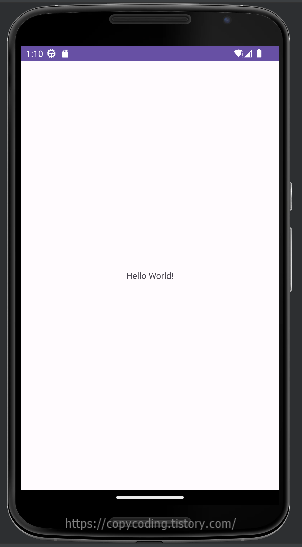
실행했을 때 결과화면은 아래와 같이 멋없는 사각형입니다.


Square.java 파일을 생성하고 사각형 용으로 도형의 좌표를 표기합니다.


static float squareCoords[] = {
            -0.5f,  0.5f, 0.0f,   // top left
            -0.5f, -0.5f, 0.0f,   // bottom left
             0.5f, -0.5f, 0.0f,   // bottom right
             0.5f,  0.5f, 0.0f }; // top right


그림에 있는 좌표를 표시하고 그리는 순서를 정하여 꼭지점의 순서를 정하게 됩니다.

특이한점은 사각형을 사각형으로 그리지 않고 3각형 2개를 그리는 방법으로 진행합니다.

private final short drawOrder[] = { 0, 1, 2, 0, 2, 3 }; // order to draw vertices

이렇게 시계 반대방향으로 순서를 나열하여 좌측과 우측의 삼각형을 그리도록 정의합니다.


// initialize byte buffer for the draw list
        ByteBuffer dlb = ByteBuffer.allocateDirect(
                // (# of coordinate values * 2 bytes per short)
                drawOrder.length * 2);
        dlb.order(ByteOrder.nativeOrder());
        drawListBuffer = dlb.asShortBuffer();
        drawListBuffer.put(drawOrder);
        drawListBuffer.position(0);


이런 작업 순서는 ByteBuffer에 저장해 둡니다.

나머지 소스들은 삼각형일때 triangleCoords로 되어있던 부분을 squareCoords로 변경합니다.


draw() 함수에서 삼각형은 꼭지점을 이용하여 그리고 사각형은 Buffer에 있는 순서를 이용하여 그리도록 수정됩니다.


// Draw the triangle
GLES20.glDrawArrays(GLES20.GL_TRIANGLES, 0, vertexCount);
 
// Draw the square
GLES20.glDrawElements(GLES20.GL_TRIANGLES, drawOrder.length,
                GLES20.GL_UNSIGNED_SHORT, drawListBuffer);


MyGLRenderer.java 파일에서는 MVP Matrix가 사용됩니다.

MVP(Model, View, Projection)은 카메라에서 모델을 바라보는 형상을 표시하는 것인데

삼각형에서는 사용하지 않았는데 사각형에서는 왜 필요한지 지식이 짧아 좀더 학습이 필요하네요.


@Override
    public void onDrawFrame(GL10 gl) {
        float[] scratch = new float[16];
        // Draw background color
        GLES30.glClear(GLES30.GL_COLOR_BUFFER_BIT | GLES30.GL_DEPTH_BUFFER_BIT);
        // Set the camera position (View matrix)
        Matrix.setLookAtM(mViewMatrix, 0, 0, 0, -3, 0f, 0f, 0f, 0f, 1.0f, 0.0f);
        // Calculate the projection and view transformation
        Matrix.multiplyMM(mMVPMatrix, 0, mProjectionMatrix, 0, mViewMatrix, 0);
        // Draw square
        mSquare.draw(mMVPMatrix);
    }


그리는 부분에서 삼각형은 Array, 사각형은 Element의 차이인데 나중에 알게되면 내용 추가를 해야 할 것 같습니다.

수정되는 부분이 많지 않아 설명이 짧게 끝났습니다.


아래는 전체 소스입니다.


AndroidManifest.xml


<?xml version="1.0" encoding="utf-8"?>
<manifest
xmlns:android="http://schemas.android.com/apk/res/android"
   
xmlns:tools="http://schemas.android.com/tools">

    <uses-feature
android:glEsVersion="0x00030000" android:required="true" />

    <application
       
android:allowBackup="true"
       
android:dataExtractionRules="@xml/data_extraction_rules"
       
android:fullBackupContent="@xml/backup_rules"
       
android:icon="@mipmap/ic_launcher"
       
android:label="@string/app_name"
       
android:roundIcon="@mipmap/ic_launcher_round"
       
android:supportsRtl="true"
       
android:theme="@style/Theme.OpenGLTriangle"
       
tools:targetApi="31">
        <activity
           
android:name=".MainActivity"
           
android:exported="true">
            <intent-filter>
                <action
android:name="android.intent.action.MAIN" />

                <category
android:name="android.intent.category.LAUNCHER" />
            </intent-filter>
        </activity>
    </application>

</manifest>


MainActivity.java


package com.copycoding.opengltriangle;

import
androidx.appcompat.app.AppCompatActivity;

import
android.opengl.GLSurfaceView;
import
android.os.Bundle;

public class
MainActivity extends AppCompatActivity {
   
private GLSurfaceView gLView;

   
@Override
   
protected void onCreate(Bundle savedInstanceState) {
       
super.onCreate(savedInstanceState);
//        setContentView(R.layout.activity_main);
        // Create a GLSurfaceView instance and set it
        // as the ContentView for this Activity.
       
gLView = new MyGLSurfaceView(this);
       
setContentView(gLView);
   
}
}


MyGLRenderer.java


package com.copycoding.openglsquare;


import android.opengl.GLES30;

import android.opengl.GLSurfaceView;

import android.opengl.Matrix;

import android.util.Log;


import javax.microedition.khronos.egl.EGLConfig;

import javax.microedition.khronos.opengles.GL10;


public class MyGLRenderer implements GLSurfaceView.Renderer {


//    private Triangle mTriangle;

    private Square mSquare;


    private static final String TAG = "MyGLRenderer";

    private final float[] mMVPMatrix = new float[16];

    private final float[] mProjectionMatrix = new float[16];

    private final float[] mViewMatrix = new float[16];

    private final float[] mRotationMatrix = new float[16];

    private float mAngle;


    @Override

    public void onSurfaceCreated(GL10 gl, EGLConfig config) {

        // Set the background frame color

        GLES30.glClearColor(0.0f, 0.0f, 0.0f, 1.0f);

        // initialize a triangle

        mSquare = new Square();

    }


    @Override

    public void onSurfaceChanged(GL10 gl, int width, int height) {

        GLES30.glViewport(0, 0, width, height);

        float ratio = (float) width / height;

        // this projection matrix is applied to object coordinates

        // in the onDrawFrame() method

        Matrix.frustumM(mProjectionMatrix, 0, -ratio, ratio, -1, 1, 3, 7);

    }


    @Override

    public void onDrawFrame(GL10 gl) {

        float[] scratch = new float[16];

        // Draw background color

        GLES30.glClear(GLES30.GL_COLOR_BUFFER_BIT | GLES30.GL_DEPTH_BUFFER_BIT);

        // Set the camera position (View matrix)

        Matrix.setLookAtM(mViewMatrix, 0, 0, 0, -3, 0f, 0f, 0f, 0f, 1.0f, 0.0f);

        // Calculate the projection and view transformation

        Matrix.multiplyMM(mMVPMatrix, 0, mProjectionMatrix, 0, mViewMatrix, 0);

        // Draw square

        mSquare.draw(mMVPMatrix);

    }

    public static int loadShader(int type, String shaderCode){


        // create a vertex shader type (GLES20.GL_VERTEX_SHADER)

        // or a fragment shader type (GLES20.GL_FRAGMENT_SHADER)

        int shader = GLES30.glCreateShader(type);


        // add the source code to the shader and compile it

        GLES30.glShaderSource(shader, shaderCode);

        GLES30.glCompileShader(shader);


        return shader;

    }


    public static void checkGlError(String glOperation) {

        int error;

        while ((error = GLES30.glGetError()) != GLES30.GL_NO_ERROR) {

            Log.e(TAG, glOperation + ": glError " + error);

            throw new RuntimeException(glOperation + ": glError " + error);

        }

    }

}


MyGLSurfaceView.java


package com.copycoding.opengltriangle;

import
android.content.Context;
import
android.opengl.GLSurfaceView;

public class
MyGLSurfaceView extends GLSurfaceView {

   
private final MyGLRenderer renderer;
    public
MyGLSurfaceView(Context context) {
       
super(context);

       
// Create an OpenGL ES 2.0 context
       
setEGLContextClientVersion(2);

       
renderer = new MyGLRenderer();

       
// Set the Renderer for drawing on the GLSurfaceView
       
setRenderer(renderer);
   
}
}


Square.java


package com.copycoding.openglsquare;


import android.opengl.GLES30;


import java.nio.ByteBuffer;

import java.nio.ByteOrder;

import java.nio.FloatBuffer;

import java.nio.ShortBuffer;


public class Square {


    private final String vertexShaderCode =

            // This matrix member variable provides a hook to manipulate

            // the coordinates of the objects that use this vertex shader

            "uniform mat4 uMVPMatrix;" +

                    "attribute vec4 vPosition;" +

                    "void main() {" +

                    // The matrix must be included as a modifier of gl_Position.

                    // Note that the uMVPMatrix factor *must be first* in order

                    // for the matrix multiplication product to be correct.

                    "  gl_Position = uMVPMatrix * vPosition;" +

                    "}";

    private final String fragmentShaderCode =

            "precision mediump float;" +

                    "uniform vec4 vColor;" +

                    "void main() {" +

                    "  gl_FragColor = vColor;" +

                    "}";


    private FloatBuffer vertexBuffer;

    private ShortBuffer drawListBuffer;


    // number of coordinates per vertex in this array

    static final int COORDS_PER_VERTEX = 3;

    static float squareCoords[] = {

            -0.5f,  0.5f, 0.0f,   // top left

            -0.5f, -0.5f, 0.0f,   // bottom left

             0.5f, -0.5f, 0.0f,   // bottom right

             0.5f,  0.5f, 0.0f    // top right

    };

    private short drawOrder[] = { 0, 1, 2, 0, 2, 3 }; // order to draw vertices


    // Set color with red, green, blue and alpha (opacity) values

    float color[] = { 0.63671875f, 0.76953125f, 0.22265625f, 1.0f };


    private final int mProgram;


    private int positionHandle;

    private int colorHandle;

    private int mVPMatrixHandle;


//    private final int vertexCount = triangleCoords.length / COORDS_PER_VERTEX;

    private final int vertexStride = COORDS_PER_VERTEX * 4; // 4 bytes per vertex


    public Square() {

        // initialize vertex byte buffer for shape coordinates

        ByteBuffer bb = ByteBuffer.allocateDirect(

                // (number of coordinate values * 4 bytes per float)

                squareCoords.length * 4);

        // use the device hardware's native byte order

        bb.order(ByteOrder.nativeOrder());


        // create a floating point buffer from the ByteBuffer

        vertexBuffer = bb.asFloatBuffer();

        // add the coordinates to the FloatBuffer

        vertexBuffer.put(squareCoords);

        // set the buffer to read the first coordinate

        vertexBuffer.position(0);


        // initialize byte buffer for the draw list

        ByteBuffer dlb = ByteBuffer.allocateDirect(

                // (# of coordinate values * 2 bytes per short)

                drawOrder.length * 2);

        dlb.order(ByteOrder.nativeOrder());

        drawListBuffer = dlb.asShortBuffer();

        drawListBuffer.put(drawOrder);

        drawListBuffer.position(0);


        int vertexShader = MyGLRenderer.loadShader(GLES30.GL_VERTEX_SHADER,

                vertexShaderCode);

        int fragmentShader = MyGLRenderer.loadShader(GLES30.GL_FRAGMENT_SHADER,

                fragmentShaderCode);


        // create empty OpenGL ES Program

        mProgram = GLES30.glCreateProgram();


        // add the vertex shader to program

        GLES30.glAttachShader(mProgram, vertexShader);


        // add the fragment shader to program

        GLES30.glAttachShader(mProgram, fragmentShader);


        // creates OpenGL ES program executables

        GLES30.glLinkProgram(mProgram);


    }


    public void draw(float[] mvpMatrix) {

        // Add program to OpenGL ES environment

        GLES30.glUseProgram(mProgram);


        // get handle to vertex shader's vPosition member

        positionHandle = GLES30.glGetAttribLocation(mProgram, "vPosition");


        // Enable a handle to the triangle vertices

        GLES30.glEnableVertexAttribArray(positionHandle);


        // Prepare the triangle coordinate data

        GLES30.glVertexAttribPointer(positionHandle, COORDS_PER_VERTEX,

                GLES30.GL_FLOAT, false,

                vertexStride, vertexBuffer);


        // get handle to fragment shader's vColor member

        colorHandle = GLES30.glGetUniformLocation(mProgram, "vColor");


        // Set color for drawing the triangle

        GLES30.glUniform4fv(colorHandle, 1, color, 0);


        // get handle to shape's transformation matrix

        mVPMatrixHandle = GLES30.glGetUniformLocation(mProgram, "uMVPMatrix");

        MyGLRenderer.checkGlError("glGetUniformLocation");

        // Apply the projection and view transformation

        GLES30.glUniformMatrix4fv(mVPMatrixHandle, 1, false, mvpMatrix, 0);

        MyGLRenderer.checkGlError("glUniformMatrix4fv");

        // Draw the square

        GLES30.glDrawElements(

                GLES30.GL_TRIANGLES, drawOrder.length,

                GLES30.GL_UNSIGNED_SHORT, drawListBuffer);


        // Draw the triangle

//        GLES30.glDrawArrays(GLES30.GL_TRIANGLES, 0, vertexCount);


        // Disable vertex array

        GLES30.glDisableVertexAttribArray(positionHandle);

    }

}


소스 바탕색이 이상하게 변하네요...


 - copy coding -


예전에 윈도우에서 테스트용으로 OpenGL로 몇 가지 만들어 본적이 있었는데 Android에서도 구현이 가능하다고 하여 간략하게 OpenGL의 구성과 사용법을 알아보기 위해 테스트를 진행하게 되었습니다.

Android에서의 OpenGL을 구현하는 방법에 대해서는 안드로이드 개발자 사이트에 설명을 해놓은 자료를 읽어보면 이해하는데 조금 도움이 됩니다.

아래에는 사이트에서 설명하고 있는 내용중 간략하게 중요하다고 생각되는 부분만 발취해 보았고 전체 내용은 아래 링크에서 읽어보는 것이 좋을 것 같습니다.


https://developer.android.com/guide/topics/graphics/opengl?hl=ko


· OpenGL ES 1.0 1.1 - API 사양은 Android 1.0 이상에서 지원됩니다.
· OpenGL ES 2.0 - API 사양은 Android 2.2(API 레벨 8) 이상에서 지원됩니다.
· OpenGL ES 3.0 - API 사양은 Android 4.3(API 레벨 18) 이상에서 지원됩니다.
· OpenGL ES 3.1 - API 사양은 Android 5.0(API 레벨 21) 이상에서 지원됩니다.


OpenGL ES 버전별로 지원하는 안드로이드 버전에 차이가 있는데 저는 OpenGL ES 3.0을 기준으로 작업을 진행 합니다.  프로젝트를 생성할 때 버전에 맞추어 선택을 합니다.


가장 기본이 되는 클래스가 2개가 있는데 하나는 GLSurfaceView


GLSurfaceView
클래스는 OpenGL API 호출을 사용하여 객체를 그리고 조작할 있는 View이며 SurfaceView 기능이 비슷합니다GLSurfaceView 인스턴스를 만들고 여기에 Renderer 추가하여 클래스를 사용할 있습니다. 그러나 터치 스크린 이벤트를 캡처하려면 OpenGL 학습 과정 터치 이벤트에 응답 표시된 대로 GLSurfaceView 클래스를 확장하여 터치 리스너를 구현해야 합니다.


GLSurfaceView는 화면(View)를 생성하는 클래스로 그려진 이미지를 표현하게 되고 화면 터치 이벤트는 직접 구현해야 한다고 되어있습니다.

OpenGL에서는 GLSurfaceViewObject로 생성하여 AndroidLayout 대신 사용합니다. activity_main.xml를 사용하는 방법도 있는지 좀더 학습을 해봐야겠지만 GLSurfaceView를 사용합니다.


두번째로 렌더링 관련 클래스입니다.


GLSurfaceView.Renderer
인터페이스를 통해서는 GLSurfaceView 그래픽을 그리는 필요한 메서드를 정의합니다. 개별 클래스로 구현된 인터페이스를 제공하고 GLSurfaceView.setRenderer() 사용하여 GLSurfaceView 인스턴스에 연결해야 합니다.
GLSurfaceView.Renderer 인터페이스를 사용하려면 다음 메서드를 구현해야 합니다.
  • onSurfaceCreated()GLSurfaceView 만들 시스템에서 메서드를 호출합니다. 메서드를 사용하여 OpenGL 환경 매개변수 설정 또는 OpenGL 그래픽 객체 초기화와 같이 번만 실행해야 하는 작업을 완료합니다.
  • onDrawFrame(): 시스템에서 GLSurfaceView 다시 그릴 때마다 메서드를 호출합니다. 메서드를 그래픽 객체 그리기( 다시 그리기) 기본 실행 지점으로 사용합니다.
  • onSurfaceChanged()GLSurfaceView 크기 변경 또는 기기 화면의 방향 변경을 비롯하여 GLSurfaceView 도형이 변경될 시스템에서 메서드를 호출합니다. 예를 들어 기기가 세로 모드에서 가로 모드로 방향을 변경하면 시스템에서 메서드를 호출합니다. 메서드를 사용하여 GLSurfaceView 컨테이너의 변경사항에 맞게 대응합니다.


GLSurfaceView.Renderer가 실제 이미지를 그리는 클랙스이고 위에 있는 3개의 메서드를 이용하여 생성과 화면의 변경사항에 따른 이미지 변경 작업등을 하게 됩니다.


OpenGL ES는 현재 3.1까지 진행이 되고 있는데 어떤 버전을 사용하여 작업하는지에 대한 설정을 AndroidManifest.xml 파일에 설정을 합니다.


<!-- Tell the system this app requires OpenGL ES 3.1. -->
<uses-feature android:glEsVersion="0x00030001" android:required="true" />


위에 표시한 예시 3개중 사용하려는 OpenGL ES 버전에 맞추어 선택해서 하나만 입력합니다.


OpenGL ES API 버전 선택을 위한 참고사항으로 다음과 같은 글이 있습니다.


OpenGL ES 1.0/1.1 API OpenGL ES 2.0 3.0 프로그래밍 방식은 상당히 다르므로 개발자는 API 사용하여 개발을 시작하기 전에 다음 요소를 신중하게 고려해야 합니다.


버전별로 구현하는 방법이 다르므로 버전선택을 잘 해야 합니다. 


지금까지 Google에서 OpenGLAndroid에 적용하기위해 필요한 사항을 정리한 페이지를 간략하게 알아보았습니다.

프로그래머는 실제 코딩을 봐야 이해가 되어서 샘플 프로젝트를 시작해 보도록 하겠습니다.


참고하려는 소스는 구글 개발자 사이트에서 제공하는 소스를 선택했습니다.

원본 내용을 보려면 설명과 함께 잘 정리되어있으니 한번 방문해서 스터디하시기 바랍니다.


https://developer.android.com/develop/ui/views/graphics/opengl/environment?hl=ko


안드로이드 버전은 Giraffe 2022.3.1으로 작업했습니다.


1. 프로젝트 생성


오늘 구현하려는 결과 이미지입니다.


앱을 만들기 위해 프로젝트를 하나 생성합니다.


먼저 [Empty Views Activity]를 선택한다.  예전 Android Studio 버전처럼 Empty Activity를 선택하면 언어 선택 항목이 없어서 java로 개발할 수 없습니다.


프로젝트 Name은 적당하게 기입하고 나머지 항목은 OpenGL ES 3.0버전에 맞추어 선택합니다.

Minimum SDK를 잘 선택하면 되겠네요.

프로젝트가 생성되면 아무것도 수정하지 않은 상태에서 실행을 해서 오류가 나는지 확인해 봅니다.


기본화면이 이상없이 잘 나오는군요.  가끔 업데이트를 하다 보면 초기 설정이 적절하지 못해 오류가 발생하여 버그 수정하는 시간이 아깝더군요.

이제 코딩을 시작 합니다.


AndroidManifest.xml 파일에 OpenGL ES 3.0을 사용하기 위한 설정을 진행합니다.


<uses-feature android:glEsVersion="0x00030000" android:required="true" />


프로젝트 생성시 Minimum SDK를 선택한 것에 맞추어 OpenGL 3.0 사용 설정을 합니다.


2. 이미지 그리기


먼저 그리고자 하는 대상을 선택 하겠습니다.  세모, 네모가 제일 간단한데 그중에 좀더 간단할것 같아 보이는 세모를 정의해 보겠습니다.


Google에 있는 설명을 그대로 이용해서 작성을 하려고 하는데 사이트에는 설명을 위해 프로그램을 조각내서 이곳 저곳에 설명을 해놓았는데 한번 붙여서 구현을 해봅니다.


원점을 기준으로 삼각형의 좌표상 위치를 설정합니다.  구글 사이트에 있는 삼각형 정의입니다.


static float triangleCoords[] = {   // in counterclockwise order:
       
0.0f,  0.622008459f, 0.0f, // top
       
-0.5f, -0.311004243f, 0.0f, // bottom left
       
0.5f, -0.311004243f, 0.0f  // bottom right
};


상단은 y 축만 값을 가지면 되고 좌우측 좌표 점 값으로 삼각형을 정의합니다.


public Triangle() {
   
// initialize vertex byte buffer for shape coordinates
   
ByteBuffer bb = ByteBuffer.allocateDirect(
           
// (number of coordinate values * 4 bytes per float)
           
triangleCoords.length * 4);
   
// use the device hardware's native byte order
   
bb.order(ByteOrder.nativeOrder());

   
// create a floating point buffer from the ByteBuffer
   
vertexBuffer = bb.asFloatBuffer();
   
// add the coordinates to the FloatBuffer
   
vertexBuffer.put(triangleCoords);
   
// set the buffer to read the first coordinate
   
vertexBuffer.position(0);


좌표점을 이용하여 삼각형 꼭지점을 정의합니다.

꼭지점을 이용하여 삼각형을 그립니다.


public void draw() {
   
// Add program to OpenGL ES environment
   
GLES30.glUseProgram(mProgram);

   
// get handle to vertex shader's vPosition member
   
positionHandle = GLES30.glGetAttribLocation(mProgram, "vPosition");

   
// Enable a handle to the triangle vertices
   
GLES30.glEnableVertexAttribArray(positionHandle);

   
// Prepare the triangle coordinate data
   
GLES30.glVertexAttribPointer(positionHandle, COORDS_PER_VERTEX,
           
GLES30.GL_FLOAT, false,
           
vertexStride, vertexBuffer);

   
// get handle to fragment shader's vColor member
   
colorHandle = GLES30.glGetUniformLocation(mProgram, "vColor");

   
// Set color for drawing the triangle
   
GLES30.glUniform4fv(colorHandle, 1, color, 0);

   
// Draw the triangle
   
GLES30.glDrawArrays(GLES30.GL_TRIANGLES, 0, vertexCount);

   
// Disable vertex array
   
GLES30.glDisableVertexAttribArray(positionHandle);
}


Google에서는 OpenGL ES 2.0으로 소스를 설명을 하고 있는데 3.0으로 변경을 해주었습니다.


3. 도형 렌더링


삼각형을 그리긴 했지만 Surface에 표현하는 작업들이 남았습니다.

위에서 설명한 2개의 기본 클래스인 Surface를 정의하고 Rendering 을 하는 두개의 프로그램이 추가되어야 합니다.

먼저 Renderer 파일을 생성합니다.


Google에 있는대로 MyGLRenderer.java 파일을 생성하고


필수 메소드를 추가해 줍니다.


@Override
public void onSurfaceCreated(GL10 gl, EGLConfig config) {
   
// Set the background frame color
   
GLES30.glClearColor(0.0f, 0.0f, 0.0f, 1.0f);
   
// initialize a triangle
   
mTriangle = new Triangle();
}

@Override
public void onSurfaceChanged(GL10 gl, int width, int height) {
    GLES30.glViewport(
0, 0, width, height);
}

@Override
public void onDrawFrame(GL10 gl) {
   
// Redraw background color
   
GLES30.glClear(GLES30.GL_COLOR_BUFFER_BIT);
}


추가한 메소드에 코드를 추가합니다.


onSurfaceCreated() - 뷰의 OpenGL ES 환경을 설정하기 위해 한 번 호출됩니다.

                    초기값을 설정해야 하면 여기에 정의합니다.

onDrawFrame() - 뷰를 다시 그릴 때마다 호출됩니다.

onSurfaceChanged() - 기기의 화면 방향이 변경되는 경우와 같이 뷰의 도형이 변경되면 호출됩니다.


이제 Surface 파일을 작성합니다.


MyGLSurfaceView.java 파일을 생성하고 GLSurfaceView로부터 상속을 받습니다.

그리고 생성자를 추가하는데 첫번째 생성자를 선택 합니다.


private final MyGLRenderer renderer;
public
MyGLSurfaceView(Context context) {
   
super(context);

   
// Create an OpenGL ES 2.0 context
   
setEGLContextClientVersion(2);

   
renderer = new MyGLRenderer();

   
// Set the Renderer for drawing on the GLSurfaceView
   
setRenderer(renderer);
}


소스는 간단합니다.

생성한 삼격형 렌더링을 SurfaceView에 넣어주면 됩니다.


4. 프로젝트 실행


이제 모든 작업이 완료되었으니 MainActivity에서 생성시 layout에 지금까지의 작업을 실행하기만 하면 되겠네요.


@Override
   
protected void onCreate(Bundle savedInstanceState) {
       
super.onCreate(savedInstanceState);
//        setContentView(R.layout.activity_main);
        // Create a GLSurfaceView instance and set it
        // as the ContentView for this Activity.
       
gLView = new MyGLSurfaceView(this);
       
setContentView(gLView);
   
}


MainActivity 작업이 제일 간단 합니다.

Android layout을 사용하지 않고 OpenGL에서 생성하여 사용한다고 설명하였듯이 새로 생성한 SerfaceView를 추가해주면 끝입니다.


구글에 있는 소스가 너무 나뉘어있고 이곳저곳에서 생략된 표시도 있어서 작동을 하기는 할까? 하는 걱정이 있었는데 위에 있는 소스를 실행하면 좀 단순 하지만 결과가 나옵니다.


Layout이나 Gradle에 추가한 작업은 없고 그냥 3개의 신규 파일이 추가되고 2개의 파일(AndroidManifest.xml, MainActivity.java)에 몇 줄 소스 작업만 진행하였습니다.


5. 전체 소스


AndroidManifest.xml


<?xml version="1.0" encoding="utf-8"?>
<manifest
xmlns:android="http://schemas.android.com/apk/res/android"
   
xmlns:tools="http://schemas.android.com/tools">

    <uses-feature
android:glEsVersion="0x00030000" android:required="true" />

    <application
       
android:allowBackup="true"
       
android:dataExtractionRules="@xml/data_extraction_rules"
       
android:fullBackupContent="@xml/backup_rules"
       
android:icon="@mipmap/ic_launcher"
       
android:label="@string/app_name"
       
android:roundIcon="@mipmap/ic_launcher_round"
       
android:supportsRtl="true"
       
android:theme="@style/Theme.OpenGLTriangle"
       
tools:targetApi="31">
        <activity
           
android:name=".MainActivity"
            
android:exported="true">
            <intent-filter>
                <action
android:name="android.intent.action.MAIN" />

                <category
android:name="android.intent.category.LAUNCHER" />
            </intent-filter>
        </activity>
    </application>

</manifest>


MainActivity.java


package com.copycoding.opengltriangle;

import
androidx.appcompat.app.AppCompatActivity;

import
android.opengl.GLSurfaceView;
import
android.os.Bundle;

public class
MainActivity extends AppCompatActivity {
   
private GLSurfaceView gLView;

   
@Override
   
protected void onCreate(Bundle savedInstanceState) {
       
super.onCreate(savedInstanceState);
//        setContentView(R.layout.activity_main);
        // Create a GLSurfaceView instance and set it
        // as the ContentView for this Activity.
       
gLView = new MyGLSurfaceView(this);
       
setContentView(gLView);
   
}
}


MyGLRenderer.java


package com.copycoding.opengltriangle;

import
android.opengl.GLES30;
import
android.opengl.GLSurfaceView;

import
javax.microedition.khronos.egl.EGLConfig;
import
javax.microedition.khronos.opengles.GL10;

public class
MyGLRenderer implements GLSurfaceView.Renderer {

   
private Triangle mTriangle;
   
@Override
   
public void onSurfaceCreated(GL10 gl, EGLConfig config) {
       
// Set the background frame color
       
GLES30.glClearColor(0.0f, 0.0f, 0.0f, 1.0f);
       
// initialize a triangle
       
mTriangle = new Triangle();
   
}

   
@Override
   
public void onSurfaceChanged(GL10 gl, int width, int height) {
        GLES30.glViewport(
0, 0, width, height);
   
}

   
@Override
   
public void onDrawFrame(GL10 gl) {
       
// Redraw background color
       
GLES30.glClear(GLES30.GL_COLOR_BUFFER_BIT);

       
mTriangle.draw();
   
}
   
public static int loadShader(int type, String shaderCode){

       
// create a vertex shader type (GLES20.GL_VERTEX_SHADER)
        // or a fragment shader type (GLES20.GL_FRAGMENT_SHADER)
       
int shader = GLES30.glCreateShader(type);

       
// add the source code to the shader and compile it
       
GLES30.glShaderSource(shader, shaderCode);
       
GLES30.glCompileShader(shader);

        return
shader;
   
}
}


MyGLSurfaceView.java


package com.copycoding.opengltriangle;

import
android.content.Context;
import
android.opengl.GLSurfaceView;

public class
MyGLSurfaceView extends GLSurfaceView {

   
private final MyGLRenderer renderer;
    public
MyGLSurfaceView(Context context) {
       
super(context);

       
// Create an OpenGL ES 2.0 context
       
setEGLContextClientVersion(2);

       
renderer = new MyGLRenderer();

       
// Set the Renderer for drawing on the GLSurfaceView
       
setRenderer(renderer);
   
}
}


Triangle.java


package com.copycoding.opengltriangle;

import
android.opengl.GLES30;

import
java.nio.ByteBuffer;
import
java.nio.ByteOrder;
import
java.nio.FloatBuffer;

public class
Triangle {


private final String vertexShaderCode =
           
"attribute vec4 vPosition;" +
                   
"void main() {" +
                   
"  gl_Position = vPosition;" +
                   
"}";

    private final
String fragmentShaderCode =
           
"precision mediump float;" +
                   
"uniform vec4 vColor;" +
                   
"void main() {" +
                   
"  gl_FragColor = vColor;" +
                   
"}";

    private
FloatBuffer vertexBuffer;

   
// number of coordinates per vertex in this array
   
static final int COORDS_PER_VERTEX = 3;
    static float
triangleCoords[] = {   // in counterclockwise order:
           
0.0f,  0.622008459f, 0.0f, // top
           
-0.5f, -0.311004243f, 0.0f, // bottom left
           
0.5f, -0.311004243f, 0.0f  // bottom right
   
};

   
// Set color with red, green, blue and alpha (opacity) values
   
float color[] = { 0.63671875f, 0.76953125f, 0.22265625f, 1.0f };

    private final int
mProgram;

    private int
positionHandle;
    private int
colorHandle;

    private final int
vertexCount = triangleCoords.length / COORDS_PER_VERTEX;
    private final int
vertexStride = COORDS_PER_VERTEX * 4; // 4 bytes per vertex


public Triangle() {
       
// initialize vertex byte buffer for shape coordinates
       
ByteBuffer bb = ByteBuffer.allocateDirect(
               
// (number of coordinate values * 4 bytes per float)
               
triangleCoords.length * 4);
       
// use the device hardware's native byte order
       
bb.order(ByteOrder.nativeOrder());

       
// create a floating point buffer from the ByteBuffer
       
vertexBuffer = bb.asFloatBuffer();
       
// add the coordinates to the FloatBuffer
       
vertexBuffer.put(triangleCoords);
       
// set the buffer to read the first coordinate
       
vertexBuffer.position(0);

        int
vertexShader = MyGLRenderer.loadShader(GLES30.GL_VERTEX_SHADER,
               
vertexShaderCode);
        int
fragmentShader = MyGLRenderer.loadShader(GLES30.GL_FRAGMENT_SHADER,
               
fragmentShaderCode);

       
// create empty OpenGL ES Program
       
mProgram = GLES30.glCreateProgram();

       
// add the vertex shader to program
       
GLES30.glAttachShader(mProgram, vertexShader);

       
// add the fragment shader to program
       
GLES30.glAttachShader(mProgram, fragmentShader);

       
// creates OpenGL ES program executables
       
GLES30.glLinkProgram(mProgram);
   
}

   
public void draw() {
       
// Add program to OpenGL ES environment
       
GLES30.glUseProgram(mProgram);

       
// get handle to vertex shader's vPosition member
       
positionHandle = GLES30.glGetAttribLocation(mProgram, "vPosition");

       
// Enable a handle to the triangle vertices
       
GLES30.glEnableVertexAttribArray(positionHandle);

       
// Prepare the triangle coordinate data
       
GLES30.glVertexAttribPointer(positionHandle, COORDS_PER_VERTEX,
               
GLES30.GL_FLOAT, false,
               
vertexStride, vertexBuffer);

       
// get handle to fragment shader's vColor member
       
colorHandle = GLES30.glGetUniformLocation(mProgram, "vColor");

       
// Set color for drawing the triangle
       
GLES30.glUniform4fv(colorHandle, 1, color, 0);

       
// Draw the triangle
       
GLES30.glDrawArrays(GLES30.GL_TRIANGLES, 0, vertexCount);

       
// Disable vertex array
       
GLES30.glDisableVertexAttribArray(positionHandle);
   
}

}


Google 사이트에 있는 소스를 복붙하다보니 띄어쓰기 줄맞춤은 좀보기 흉하네요.

Android에서 OpenGL을 어떻게 사용하는가에 대한 흐름을 대충 알것 같습니다.

몇개 더 작업을 하면서 학습을 해봐야 겠네요.


- copy coding -


무료이면서 기능도 많고 가벼워서 많이 사용했는데 Oracle이 사가면서 다른 DB를 더 많이 사용했는데 간단한 테스트가 필요해서 설치를 하게 되었습니다.

간단한 테스트를 하려던 건데 설치 과정은 상당히 길게 진행이 됩니다.


https://dev.mysql.com/downloads/installer/


다운로드를 위해 사이트에 접속을 하면 오라클 사이트의 대표적인 먹지도 못하는 쿠키 허용 팝업이 나타납니다.


이럴 때는 그냥 [모두 거절] 버튼을 클릭하고 진행을 하면 됩니다.


[닫기] 버튼을 클릭 합니다.


아래에 있는 윈도우 버전을(mysql-installer-community-8.0.35.0.msi) 설치를 합니다.

Windows (x86, 32-bit), MSI Installer          8.0.35    288.6M 

우측에 있는 [Download] 버튼을 클릭하여 다음 단계로 이동합니다.


여러 도움을 받으려면 회원 가입을 하거나 로그인을 하라고 하는데 지금은 MySQL 설치만 진행하려고 하기 때문에 하단에 있는 [No thanks, just start my download.] 글씨를 클릭하여 파일을 다운로드 받습니다.

파일은 자동으로 다운로드가 진행되며 탐색기로 다운로드 폴더를 열어 파일을 확인합니다.

새로 탐색기를 열어야 한다면 단축 키( 윈도우버튼 + E )를 이용하여 실행합니다.


다운받은 파일을 더블 클릭하여 실행해주면 설치가 진행 됩니다.


기본적으로 [Server only]가 선택되어 있어 서버만 설치하도록 되어 있는데 추가로 설치할 수 있는 기능을 확인 하려면 [Custom]을 체크 하고 [Next] 버튼을 클릭해 줍니다.

각 라디오 버튼 별로 설치되는 항목을 확인하려면 하나씩 선택하고 [Next] 버튼을 클릭하여 확인한 후 다시 [Back] 버튼으로 돌아오면 됩니다.


Custom을 선택한 경우의 모습으로 각각의 메뉴를 확장해서 선택 옵션을 확인 하고 필요한 항목을 선택하고 우측 화살표를 클릭하면 우측 설치 예정 목록에 추가가 됩니다.

트리 메뉴의 마지막 단계를 선택해야 우측으로 이동하고 이동된 항목은 비활성화 됩니다.

모든 선택이 완료 되었으면 [Next] 버튼을 클릭 합니다.


기존에 Microsoft Visual C++이 설치되어 있지 않은 경우 설치를 진행하기위해 미리 설치를 해야하는 항목입니다.  하단에 있는 [Execute] 버튼을 클릭하여 설치합니다.

이런 팝업 화면이 안나온다면 사용하시는 컴퓨터에 이미 설치가 되어있다는 의미입니다.


Execute 버튼을 클릭하면 Microsoft Visual C++ 라이선스 항목이 나옵니다.  [동의함]에 체크하고 [설치] 버튼을 클릭해 줍니다.


Microsoft Visual C++ 설치가 완료되었습니다. [닫기] 버튼을 클릭 합니다.


MySQL ServerWorkbench가 모두 Microfost Visual C++ 동일한 프로그램이 필요한 경우로 한번만 설치하는 것으로 해결이 되었습니다.

[Next] 버튼을 클릭하여 다음 단계로 이동합니다.


MySQL WorkbenchGUI 환경의 DB 툴입니다.  오랜지, 토드, DBeaver등과 같다고는 할 수 없고 오라클의 SQL Developer 정도의 기능을 가진 MySQL을 사용하기위한 Windows용 툴입니다.

선택한 항목을 확인하고 이상이 없으면 [Execute] 버튼을 클릭하여 설치를 진행합니다.

아니면 [Back] 버튼을 이용하여 설정을 변경하면 됩니다.


위쪽부터 하나씩 설치가 진행 됩니다.


선택한 기능들에 대한 설치가 완료 되었습니다.  [Next] 버튼을 클릭 합니다.


설치 후 설정 작업을 진행하는 단계로 [Next] 버튼을 선택하여 두개의 제품에 대해 설정(configure)을 진행 합니다.


MySQL을 어떤 용도로 사용할 것인가를 선택하고 Server Port를 결정합니다.

Port3306으로 되어있지만 보안이나 기타 이유로 변경할 수 있습니다.

변경 작업이 완료되었으면 [Next] 버튼을 클릭 합니다.


사용자 인증은 첫번째 항목으로 기본설정 되어있습니다.  MySQL을 단독으로 사용하기에는 보안이 좋지만 다른 프로그램과 연동해서 사용하려면 아래에 있는 Legacy Authentication으로 설정을 합니다.

[Use Legacy Authentication Method]를 선택하고 [Next] 버튼을 클릭 합니다.


ROOT 비밀번호를 설정하며 나중에 DB에 로그인 하려면 필요하니 비밀번호는 꼭 기억해 둡니다.

필요하다면 아래에 있는 [User Accounts]에서 root 이외의 사용자 계정을 바로 생성할 수도 있습니다.

[Next] 버튼을 클릭합니다.


Windows에 서비스로 등록하는 명칭을 결정하는 화면으로 기본값은 버전이 붙어있습니다.

여러 버전을 운용하지 않는다면 통상적인 MySQL로 변경해주고 [Next] 버튼을 클릭합니다.


폴더에 저장되어있는 DB 데이터 파일에 접근할 수 있는 권한입니다.

MySQL이 설치되고 DB를 생성하면 파일로 만들어 지는데 이곳에 접근하는 권한입니다.

[Next] 버튼을 클릭합니다.


지금까지 진행한 설정[Configuration] 값을 적용하는 단계입니다.

[Execute]를 클릭하면 하나씩 설정이 실행됩니다.


설정 반영이 완료되었습니다.  [Finish] 버튼을 클릭합니다.


이제 제품에 대한 설정을 진행하는 단계입니다.

무슨 설치 단계를 이렇게 많이 해놓았을까 이상하네요.  [Next버튼을 클릭합니다.


DB 서버에 접속을 하는 테스트 단계로 앞에서 입력했던 root 비밀번호를 입력하고 [Check] 버튼을 클릭 합니다.

StatusConnection succeeded가 나오면 접속에 성공한 것입니다.  [Next] 버튼을 클릭합니다.


모든 설정작업이 잘 완료되었습니다.  [Next] 버튼을 클릭합니다.


모든 MySQL 설치과정이 완료된 단계로 [Finish] 버튼을 클릭하여 종료 하거나 Start MySQL Workbench after setup을 체크하여 workbench를 실행시켜볼 수 있습니다.  여기서는 한번 실행해 봅니다.


MySQLWindows GUI 툴이 실행 됩니다.  접속을 해보도록 하겠습니다.


MySQL Connections에 있는 회색 박스를 클릭하고 root 비밀번호를 입력하여 로그인 합니다.


설치된 MySQL DB에 접속이 되었고 이곳에서 DB상태등을 확인하며 DB작업을 할 수 있는 화면이 나타납니다.

길고도 지루한 설치과정이 완료되었습니다.


- copy coding -


동영상 편집을 하려고 프로그램을 찾아보니 그동안 컴퓨터를 새로 바꾸면서 동영상 관련 프로그램도 사라져 버렸네요.  프리미어와 동급 수준의 기능 가지고 있으면서 무료로 제공되는 다빈치 리졸브 프로그램을 설치해 보도록 합니다.

일반적인 자르기, 붙이기, 배경음악, 텍스트 추가등은 쉽게 작업이 가능합니다.  전문적인 작업을 하려면 매뉴얼이나 동영상 강좌를 보시면 시각적인 기능들이라 쉽게 따라하실 수 있습니다.  


설치를 진행하기 전에 한가지 주의사항으로는 전문적인 기능들이 포함되어 있어 프로그램이 무겁습니다.  컴퓨터 사양이 높지 않으면 설치는 할 수 있지만 프로그램을 실행하면 안내 팝업 나오고 실행을 할 수 없습니다.


먼저 프로그램을 다운로드 받아보도록 하겠습니다.


https://www.blackmagicdesign.com/kr/products/davinciresolve


사이트에 접속을 합니다.


무료 버전과 유료 버전이 있습니다. [무료 다운로드하기] 버튼을 클릭합니다.


왼쪽이 무료 버전이고 오른쪽 studio가 유료 버전입니다.

컴퓨터 운영체제에 맞는 제품을 선택해서 다운로드를 받기위해 저는 [Windows]를 클릭합니다. 


간단한 개인정보를 등록하라고 하는데 형식적인 것으로 모두 1로 입력하고 메일 주소도 형식만 갖추면 test@test.com 이렇게 해도 다운로드가 가능 합니다.

다른 프로그램처럼 확인 메일을 보내고 인증하고 회원가입하고 이런거 없습니다.

[등록 & 다운로드하기] 버튼을 클릭하면 팝업이 나옵니다.


팝업에 있는 zip 파일을 클릭하는 것이 아니고 자동으로 다운로드가 진행됩니다.  만약 자동 다운로드가 안되는 경우 위와 같은 팝업에서 [DaVinci_Resolve_18.6.2_Windows.zip] 버튼을 직접 클릭해서 다운받습니다.


다운받은 압축파일을 풀면 실행파일 1개가 나오는데 파일을 실행하여 설치를 진행합니다.

설치 위치를 변경하지 않는다면 대부분 그냥 다음으로 넘어가면 됩니다.


프로그램에 필요한 파일들입니다. [Install] 버튼을 클릭합니다.


설정을 위한 작업을 진행합니다.  [Next] 버튼을 클릭합니다.


저작권 확인으로 체크를 하고 [Next] 버튼을 클릭합니다.


설치위치를 변경하지 않으면 그냥 [Next] 버튼을 클릭합니다.


설치를 환경 설정이 완료되었습니다.

[Install] 버튼을 클릭해서 설치를 진행합니다.


설치가 진행되는데 좀 기다립니다.


중간에 체크하는 것 없이 설치가 완료되었습니다.

[Finish] 버튼을 클릭 합니다.


설치와 설정을 반영하기 위해 [] 버튼을 클릭하여 컴퓨터를 재시작 합니다.


컴퓨터를 재시작 하고 바탕화면에 있는 다빈치 리졸브 아이콘을 클릭해서 프로그램을 시작합니다.


아래 설정 내용은 프로그램을 처음 실행할 때만 나오고 설정을 완료하고 나면 다음부터는 바로 프로그램이 실행됩니다.


처음 설치를 했으니 설명을 보려면 [Learn More], 그냥 진행을 하려면 [Continue] 버튼을 클릭 합니다.


[Quick Setup] 버튼을 클릭하면 몇가지 설정 작업을 하게 됩니다.

실제 사용하면서 해도 되는 설정이기 때문에 [SKIP AND START RIGHT NOW]를 클릭해도 됩니다.

어떤 설정작업이 있는지 보기위해 [Quick Setup] 버튼을 클릭합니다.


운영체제와 그래픽 카드를 체크한다고 합니다.

[Continue] 버튼을 클릭합니다.


새로운 편집을 시작할 때 어떤 크기의 미디어 작업을 하려는지 설정하는 팝업으로 설정하려는 크기의 네모를 클릭해 보면 하단에 크기가 나타납니다.


하나를 선택하고 [Continue] 버튼을 클릭합니다.


작업하는 미디어(동영상, 사진, 음악)가 저장되는 기본 폴더 위치입니다.   미리 폴더를 생성해 두었다면 선택하고 [Continue] 버튼을 클릭합니다.

이건 다음에 실제 작업을 하면서 설명을 드리겠습니다.


작업용 설정이 완료되었습니다.  [Start] 버튼을 클릭하여 실제 다빈치 리졸브 프로그램을 실행합니다.

몇개의 팝업이 나옵니다.


[OK] 버튼을 클릭합니다.


그런데 이런 팝업이 나오면 문제가 시작됩니다.

컴퓨터 사양이 낮아서 발생하는 안내입니다.

한글로는 아래처럼


이렇게 보여집니다.  다빈치 리졸브를 잘 알고 있다면 [구성 업데이트] 버튼을 클릭해 봅니다.


메인 디스플레이 GPU, Unknown 지원되지 않습니다라고 하는데 저는 설정을 바꿔봐도 다음단계로 넘어가지 못했습니다.  , 이 컴퓨터는 다빈치 리졸브를 사용할 수 없는 사양의 컴퓨터입니다.


저는 하는 수 없이 다시 다른 컴퓨터에 설치를 진행해서 다음 단계로 넘어가는데 다음 단계는 그냥 다빈치 리졸브 프로그램의 초기 작업 화면입니다.

다음부터 프로그램을 시작하면 위의 설정화면은 나오지 않고 인트로가 나온 후 바로 아래 화면부터 나오게 됩니다.


인트로가 나오고 잠시 후


다빈치 리졸브 편집 프로그램이 나타납니다.

다음 글에서는 간단한 동영상 편집을 해보도록 하겠습니다.


1···45678910···119

+ Recent posts