개인적으로 프로젝트의 성공 여부는 70%가 디자인이라고 생각합니다. 메인 시안이 어떻게 나오는가에 따라 코딩을 하나도 하지 않았어도 고객이 바라보는 시선이 달라지는 경우가 있습니다. 디자인감각도 있고 구현에 대한 기능적인 부분까지 갖추어 진다면 얼마나 좋을까요.
오늘은 리니어레이아웃의 기본적인 옵션들에 대한 사용 방법으로 버튼, 텍스트, 이미지 등을 원하는 곳에 위치시키는 방법에 대해 공부해 봅니다. 설명을 끝내고 나니 아래 글을 읽을 때 위젯과 뷰(View : TextView, Button 등을 가리킴) 단어를 같이 사용하여 혼란이 있을 수 있으나 동일한 내용입니다.
LinearLayout에 사용되는 설정 값들은 아래와 같습니다
|
옵션 |
설명 |
|
orientation |
layout의 정렬 방향으로 행 "horizontal", 열 "vertical"을 뜻한다. |
|
baselineAligned |
기준점을 설정해서 정렬하는 기능으로 false로 설정하면 baselines 정렬을 하지 않는다. |
|
baselineAlignedChildIndex |
linear layout이 다른 layout의 부분일 경우 몇 번째 위젯에. 정렬의 기준을 정할 것인가에 대한 순번으로 0부터 시작 한다. |
|
divider |
Drawable을 button 사이의 구분자로 사용 한다. |
|
gravity |
뷰 자신은 영역 내에서 특정 위치를 설정 한다 |
|
measureWithLargestChild |
true 로 설정 하면 layout 내 weight을 가지는 모든 뷰의 크기를 가장 큰 뷰의 크기로 변경 시킨다. |
|
weightSum |
위젯에 사용된 weight 들의 합계. |
1. 방향(orientation)
LinearLayout의 orientation은 가장 기본적이고 필수적인 설정으로 뷰(view)들을 수직(vertical) 또는 수평(horizontal)으로 정렬 하는데 사용 합니다.
|
<LinearLayout xmlns:android="http://schemas.android.com/apk/res/android" |
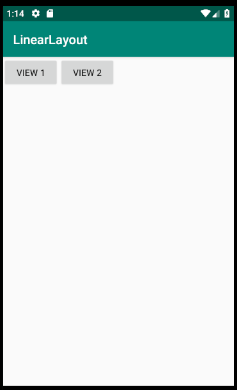
xml 예와 같이 android:orientation="horizontal" 로 설정하면 수평으로 정렬을 하고
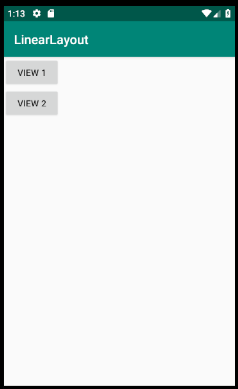
android:orientation="vertical" 로 설정하면 뷰들을 수직으로 정렬을 합니다.
2. baselineAligned
baselineAligned는 뷰들을 정렬하기 위해 기준점을 설정하고 그 점을 기준으로 평형을 맞추는 방법입니다. 특별히 설정을 하지 않더라도 기본적으로 true 값을 가지고 있습니다. 그러나 높이가 다른 뷰들이 모이면 높낮이에 차이가 발생합니다.
| <LinearLayout xmlns:android="http://schemas.android.com/apk/res/android" android:layout_width="match_parent" android:layout_height="match_parent" android:orientation="horizontal" android:baselineAligned="true" > <Button android:layout_width="wrap_content" android:layout_height="50dp" android:text="View 1" /> <Button android:layout_width="wrap_content" android:layout_height="50dp" android:text="View 2" /> <Button android:layout_width="wrap_content" android:layout_height="50dp" android:text="View 3\n test" /> <Button android:layout_width="wrap_content" android:layout_height="50dp" android:text="View 4" /> </LinearLayout> |
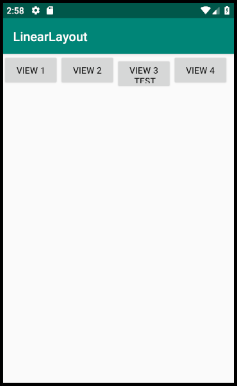
베이스라인 정렬을 취소하면 기본적인 상담 맞춤으로 정렬됩니다.
android:baselineAligned="false"
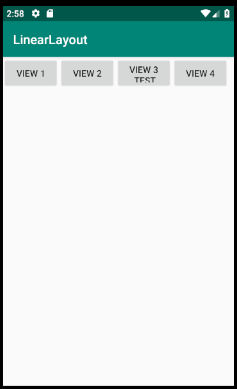
베이스라인 정렬 보다는 이게 더 보기 좋습니다. 그렇지만 모든 레이아웃에 설정 값이 반영되기 때문에 가능하면 레이아웃 중첩에서 사용 하는게 좋을 것 같습니다.
3. baselineAlignedChildIndex
뷰들이 뒤 섞여 있는 경우 베이스 라인 정렬 기준을 뷰들 중 하나를 선택해서 적용 하는데 사용하는 옵션입니다. 순서는 0부터 시작됩니다.
다음과 같이 뷰들이 나열되어 있고 내부에 레이아웃 중첩을 사용하고 있는 경우
| <LinearLayout xmlns:android="http://schemas.android.com/apk/res/android" android:layout_width="match_parent" android:layout_height="match_parent" android:orientation="horizontal" android:baselineAligned="true" > <Button android:layout_width="wrap_content" android:layout_height="50dp" android:text="View 1" /> <Button android:layout_width="wrap_content" android:layout_height="50dp" android:text="View 2" /> <Button android:layout_width="wrap_content" android:layout_height="70dp" android:text="View 3\n test" /> <LinearLayout android:layout_width="wrap_content" android:layout_height="wrap_content" android:orientation="vertical" > <Button android:layout_width="wrap_content" android:layout_height="wrap_content" android:text="View 4" /> <Button android:layout_width="wrap_content" android:layout_height="wrap_content" android:text="View 5" /> </LinearLayout> </LinearLayout> |
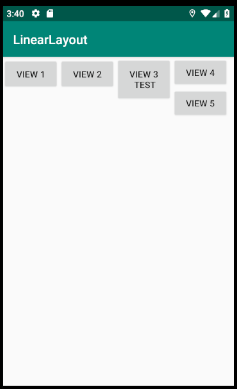
view5 를 기준으로 정렬을 하고 싶다면 view5가 중첩된 레이아웃에서 사용되고 순서가 두 번째 이므로 아래와 같이 선언해 주면 됩니다.
android:baselineAlignedChildIndex="1"
| <LinearLayout xmlns:android="http://schemas.android.com/apk/res/android" android:layout_width="match_parent" android:layout_height="match_parent" android:orientation="horizontal" android:baselineAligned="true" > <Button android:layout_width="wrap_content" android:layout_height="50dp" android:text="View 1" /> <Button android:layout_width="wrap_content" android:layout_height="50dp" android:text="View 2" /> <Button android:layout_width="wrap_content" android:layout_height="70dp" android:text="View 3\n test" /> <LinearLayout android:layout_width="wrap_content" android:layout_height="wrap_content" android:orientation="vertical" android:baselineAlignedChildIndex="1" > <Button android:layout_width="wrap_content" android:layout_height="wrap_content" android:text="View 4" /> <Button android:layout_width="wrap_content" android:layout_height="wrap_content" android:text="View 5" /> </LinearLayout> </LinearLayout> |
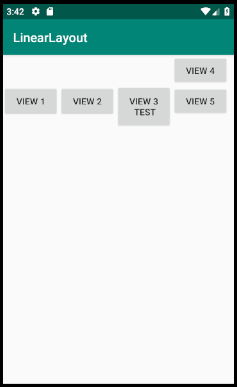
자주 사용 되지는 않을 것 같군요.
4. divider
divider는 말 그대로 나누는 건데 뷰 중간에 이미지를 사용하여 좀 더 레이아웃을 예쁘게 꾸며 주는 옵션입니다. 사용하려면 미리 이미지를 만들어 @drawable에 추가를 해야 합니다. 저는 대충 기존에 있는 아이콘을 사용하여 구현을 해 보았습니다. 최악의 디자인이 되겠군요.
| <LinearLayout xmlns:android="http://schemas.android.com/apk/res/android" android:layout_width="match_parent" android:layout_height="match_parent" android:orientation="vertical" android:divider="@mipmap/ic_launcher" android:showDividers="middle" > <Button android:layout_width="wrap_content" android:layout_height="50dp" android:text="View 1" /> <Button android:layout_width="wrap_content" android:layout_height="50dp" android:text="View 2" /> <Button android:layout_width="wrap_content" android:layout_height="70dp" android:text="View 3\n test" /> </LinearLayout> |
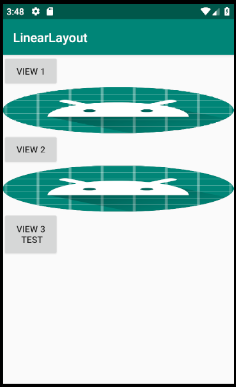
디바이더를 사용하면 뷰 사이에 이미지 태그를 사용하여 직접 추가하지 않아도 됩니다. 사용 예에서는 중간에만 이미지를 추가 하였는데 구분자를 이용하여 시작과 끝 부분에도 추가가 가능합니다
android:showDividers="middle|beginning|end"
5. gravity
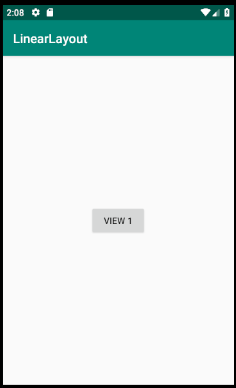
뷰를 정렬 할 때 화면이 아래쪽으로 중력이 작용한다고 가정하여 뷰들을 정렬하는 옵션으로 구분자(|)를 사용하여 여러 개를 설정할 수 있습니다.
|
Constant |
Value |
Description |
|
bottom |
50 |
크기 변화 없이 container의 bottom에 정렬 |
|
center |
11 |
크기 변화 없이 container의 가로 세로 방향의 중앙에 정렬 |
|
center_horizontal |
1 |
크기 변화 없이 container의 가로 방향의 중앙에 정렬 |
|
center_vertical |
10 |
크기 변화 없이 container의 세로 방향의 중앙에 정렬 |
|
clip_horizontal |
8 |
horizontal gravity를 기준으로 container의 경계를 벗어나는 부분을 잘라 낸다. left gravity의 경우 오른쪽을 right의 경우 왼쪽을 잘라 낸다. 양쪽에 경우에는 양쪽 모두 잘라 낸다. |
|
clip_vertical |
80 |
clip_horizontal과 반대되는 옵션이다 |
|
end |
800005 |
크기 변화 없이 container의 end에 정렬 |
|
fill |
77 |
위젯의 크기를 container의 크기에 맞추어 확장한다 |
|
fill_horizontal |
7 |
container의 크기에 맞추어 위젯의 가로 크기를 확장한다 |
|
fill_vertical |
70 |
container의 크기에 맞추어 위젯의 세로 크기를 확장한다 |
|
left |
3 |
크기 변화 없이 container의 좌측에 정렬 |
|
right |
5 |
크기 변화 없이 container의 우측에 정렬 |
|
start |
800003 |
크기 변화 없이 container의 시작 위치에 정렬 |
|
top |
30 |
크기 변화 없이 container의 위에 정렬 |
| <LinearLayout xmlns:android="http://schemas.android.com/apk/res/android" android:layout_width="match_parent" android:layout_height="match_parent" android:orientation="vertical" android:gravity="center" > <Button android:layout_width="wrap_content" android:layout_height="wrap_content" android:text="View 1" /> </LinearLayout> |
6. measureWithLargestChild
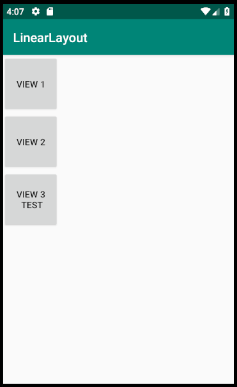
뷰의 높이가 다양할 경우 지저분한 모양을 갖게 됩니다. 이런 경우 가장 큰 뷰의 높이에 모두 맞추어 좀 더 통일된 이미지를 얻는데 사용할 수 있습니다.
| <LinearLayout xmlns:android="http://schemas.android.com/apk/res/android" android:layout_width="match_parent" android:layout_height="wrap_content" android:orientation="vertical" > <Button android:layout_width="wrap_content" android:layout_height="60dp" android:layout_weight="1" android:text="View 1" /> <Button android:layout_width="wrap_content" android:layout_height="90dp" android:layout_weight="1" android:text="View 2" /> <Button android:layout_width="wrap_content" android:layout_height="70dp" android:layout_weight="1" android:text="View 3\n test" /> </LinearLayout> |
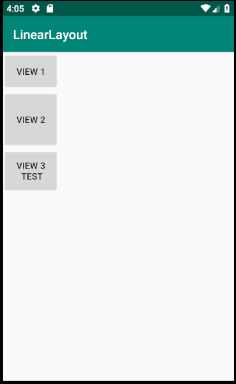
높낮이가 다양한 경우 아래와 같이 옵션을 추가해 줍니다.
android:measureWithLargestChild="true
| <LinearLayout xmlns:android="http://schemas.android.com/apk/res/android" android:layout_width="match_parent" android:layout_height="wrap_content" android:orientation="vertical" android:measureWithLargestChild="true" > <Button android:layout_width="wrap_content" android:layout_height="60dp" android:layout_weight="1" android:text="View 1" /> <Button android:layout_width="wrap_content" android:layout_height="90dp" android:layout_weight="1" android:text="View 2" /> <Button android:layout_width="wrap_content" android:layout_height="70dp" android:layout_weight="1" android:text="View 3\n test" /> </LinearLayout> |
7. weightSum
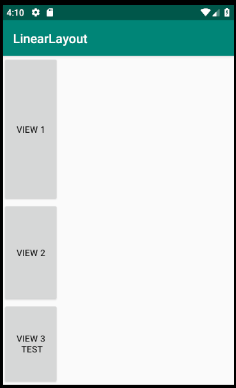
뷰의 높이를 숫자가 아닌 비율로 설정할 수 있습니다. 이 떄 비율의 총 합을 몇을 기준으로 할 것인지 설정 하는 것으로 100을 기준으로 했다면 비율의 총 합은 100이 되어야 합니다. 1 이라면 비율을 0.5, 0.2... 이렇게 되겠지요.
weightSum 없이 layout_weight을 사용해서 크기를 분할 하여 사용 할 수도 있습니다.
| <LinearLayout xmlns:android="http://schemas.android.com/apk/res/android" android:layout_width="match_parent" android:layout_height="match_parent" android:orientation="vertical" android:weightSum="100" > <Button android:layout_width="wrap_content" android:layout_height="wrap_content" android:layout_weight="50" android:text="View 1" /> <Button android:layout_width="wrap_content" android:layout_height="wrap_content" android:layout_weight="30" android:text="View 2" /> <Button android:layout_width="wrap_content" android:layout_height="wrap_content" android:layout_weight="20" android:text="View 3\n test" /> </LinearLayout> |
신규 에디터로 글을 쓰고 있는데 글을 쓰기 힘든걸 넘어 더이상 글을 쓰기 싫게 만드는 군요. -_-;;;
flash 지원 중단 때문인지는 모르겠지만 사진 편집 기능 빼고 그냥 예전걸로 글쓰게 해줌 안되나...
- copy coding -
'Android' 카테고리의 다른 글
| 안드로이드 스튜디오 스마트폰 연결 안될 때 인식 방법 (0) | 2021.02.28 |
|---|---|
| 안드로이드(Android) 레이아웃 RelativeLayout 정리 (0) | 2021.02.21 |
| 안드로이드(Android) 권한(Permission) 요청 및 획득 (8) | 2021.01.25 |
| 안드로이드(Android) 핸드폰 version 정보와 API Level 확인 방법 (0) | 2021.01.21 |
| 안드로이드(Android) 파일 읽기 쓰기 및 파일 위치 확인 (0) | 2020.12.25 |