from 에서 자주 사용하는 태그들에 대한 값을 설정하는 기본적인 방법을 알아봅니다. 전에 설명한 form 태그에서 값을 읽어오는 방법과 연결된 내용입니다.
먼저 jQuery 버전에 따라 기능 사용법이 다를 수 있어 사용된 jQuery 버전 정보는 아라와 같습니다.
< script src = "https://code.jquery.com/jquery-3.7.0.js " ></ script >
1. input tag 값 설정
- input tag 사용 방법
다음과 같이 input tag 를 추가하고 id, class, name 을 설정합니다.
< input type = "text" id = "input_id" class = "input_class" name = "input_name" >
- input tag 값 설정 방법
input tag 에 설정한 id, class, name 을 이용하여 input box 에 아래와 같은 방법으로 값을 설정합니다.
//id 로 값 설정
$ ( "#input_id" ). val ( "set input Value by id" );
//class 로 값 설정
$ ( ".input_class" ). val ( "set input Value by class" );
//name 으로 값 설정
$ ( 'input[name="input_name"]' ). val ( "set input Value by name" );
2. textarea tag 값 설정
- textarea tag 사용 방법
다음과 같이 text tag 를 추가하고 id, class, name 을 설정합니다.
< textarea id = "textarea_id" class = "textarea_class" name = "textarea_name" ></ textarea >
- textarea tag 값 설정 방법
textarea tag 에 설정한 id, class, name 을 이용하여 값을 아래와 같은 방법으로 설정할 수 있습니다.
input box 와 동일한 방법 입니다.
//id 로 값 설정
$ ( '#textarea_id' ). val ( "set textarea Value by id" );
//class 로 값 설정
$ ( '.textarea_class' ). val ( "set textarea Value by class" );
//name 으로 값 설정
$ ( 'textarea[name=textarea_name]' ). val ( "set textarea Value by name" );
3. select tag 값 설정
- select tag 사용 방법
아래와 같이 select tag 를 추가하고 id, class, name 을 설정합니다.
< select id = "sel_id" class = "sel_class" name = "sel_name" >
< option value = "s1" > select1 </ option >
< option value = "s2" > select2 </ option >
< option value = "s3" > select3 </ option >
</ select >
- select 에 value 를 이용한 설정 방법
select tag 에 설정한 id, class, name 을 이용하여 value 값을 설정하는 방법으로 아래와 같이 선택이 되도록 합니다.
//id 로 값 설정
$ ( '#sel_id' ). val ( "s2" );
//class 로 값 설정
$ ( '.sel_class' ). val ( "s3" );
//name 으로 값 설정
$ ( "select[name='sel_name']" ). val ( "s1" );
- select 의 text 를 이용한 설정 방법
- select tag 에 사용한 text 를 이용하여 선택이 되도록 설정할 수 있습니다.
//id 로 값 설정
$ ( "#sel_id option:selected" ). text ( "select2" );
//class 로 값 설정
$ ( ".sel_class option:selected" ). text ( "select3" );
//name 으로 값 설정
$ ( "select[name='sel_name'] option:selected" ). text ( "select1" );
- 한가지 더 select 항목의 순서를 이용하여 선택을 설정하는 방법입니다.
//--Select by index 로 값 설정
document . getElementById ( "sel_id" ). options . selectedIndex = 1 ;
4. radio tag 값 설정
- radio tag 사용 방법
radio tag 를 추가하고 id, class, name 을 설정합니다.
< input type = "radio" name = "ra_name" class = "ra_class1" id = "ra_id1" value = "radio1" > radiooo
< input type = "radio" name = "ra_name" class = "ra_class2" id = "ra_id2" value = "radio2" > radiiii
< input type = "radio" name = "ra_name" class = "ra_class3" id = "ra_id3" value = "radio3" > raddddd
- 설정한 id, name, class 를 이용하여 radio button 을 체크 하거나 체크 해제를 할 수 있습니다.
//id 로 값 설정
$ ( '#ra_id1' ). attr ( 'checked' , true );
$ ( '#ra_id1' ). attr ( 'checked' , false );
$ ( "#ra_id1" ). prop ( "checked" , true );
$ ( "#ra_id1" ). prop ( "checked" , false );
//class 로 값 설정
$ ( '.ra_class2' ). attr ( 'checked' , true );
$ ( '.ra_class2' ). attr ( 'checked' , false );
//name 으로 값 설정
$ ( 'input:radio[name=ra_name][value=radio1]' ). attr ( 'checked' , true );
$ ( 'input:radio[name="ra_name"][value="radio2"]' ). prop ( 'checked' , true );
var radValue = "radio3" ;
$ ( 'input:radio[name="ra_name"][value=' + radValue + ']' ). prop ( 'checked' , true );
동일한 내용을 한쌍으로 만들었습니다.
true 는 선택이고 false 는 선택 해제입니다.
false 를 먼저 주석 처리하고 하나씩 테스트 해보면 됩니다.
5. checkbox tag 값 설정
- checkbox tag 사용 방법
checkbox 를 추가하고 id, class, name 을 설정합니다.
< input type = "checkbox" name = "chk_name1" id = "chk_id1" class = "chk_class1" value = "chk01" > Check01
< input type = "checkbox" name = "chk_name2" id = "chk_id2" class = "chk_class2" value = "chk02" > Check02
< input type = "checkbox" name = "chk_name3" id = "chk_id3" class = "chk_class3" value = "chk03" > Check03
- checkbox 값 설정 방법
각 소스는 쌍으로 true, false 로 체크와 체크 해제를 하게 작성되었습니다.
radio 와 같은 방법으로 동일한 id, class 등은 하나씩 번갈아 가며 주석처리해서 테스트하면 됩니다.
//id 로 값 설정
$ ( '#chk_id1' ). prop ( 'checked' , true );
$ ( '#chk_id1' ). prop ( 'checked' , false );
document . getElementById ( 'chk_id2' ). checked = true ;
document . getElementById ( 'chk_id2' ). checked = false ;
//class 로 값 설정
$ ( '.chk_class3' ). prop ( 'checked' , true );
$ ( '.chk_class3' ). prop ( 'checked' , false );
//name 으로 값 설정
$ ( "input[name=chk_name3]" ). prop ( "checked" , true );
$ ( "input[name=chk_name3]" ). prop ( "checked" , false );
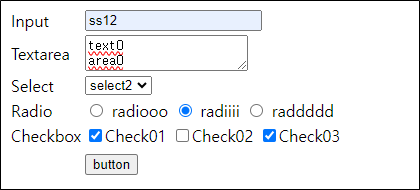
대충 구현한 웹 모양입니다.
- 전체 소스
소스가 길어 가독성이 떨어지는 버튼관련 소스는 생략했습니다.
필요하면 이전 글에 있는 소스를 복사하거나 참조하여 테스트 하면 됩니다.
< html lang = "en" >
< head >
< meta charset = "utf-8" >
< title > form value </ title >
< script src = "https://code.jquery.com/jquery-3.7.0.js " ></ script >
</ head >
< body >
< table >
< tr >
< td > Input </ td >
< td >< input type = "text" id = "input_id" class = "input_class" name = "input_name" ></ td >
</ tr >
< tr >
< td > Textarea </ td >
< td >< textarea id = "textarea_id" class = "textarea_class" name = "textarea_name" ></ textarea ></ td >
</ tr >
< tr >
< td > Select </ td >
< td >
< select id = "sel_id" class = "sel_class" name = "sel_name" >
< option value = "s1" > select1 </ option >
< option value = "s2" > select2 </ option >
< option value = "s3" > select3 </ option >
</ select >
</ td >
</ tr >
< tr >
< td > Radio </ td >
< td >
< input type = "radio" name = "ra_name" class = "ra_class1" id = "ra_id1" value = "radio1" > radiooo
< input type = "radio" name = "ra_name" class = "ra_class2" id = "ra_id2" value = "radio2" > radiiii
< input type = "radio" name = "ra_name" class = "ra_class3" id = "ra_id3" value = "radio3" > raddddd
</ td >
</ tr >
< tr >
< td > Checkbox </ td >
< td >
< input type = "checkbox" name = "chk_name1" id = "chk_id1" class = "chk_class1" value = "chk01" > Check01
< input type = "checkbox" name = "chk_name2" id = "chk_id2" class = "chk_class2" value = "chk02" > Check02
< input type = "checkbox" name = "chk_name3" id = "chk_id3" class = "chk_class3" value = "chk03" > Check03
</ td >
</ tr >
< tr >
< td ></ td >
< td ></ td >
</ tr >
< tr >
< td ></ td >
< td >< button onclick = " btnClick ();" > button </ button ></ td >
</ tr >
< script >
$ ( document ). ready ( function () {
//--Input
//id 로 값 설정
$ ( "#input_id" ). val ( "set input Value by id" );
//class 로 값 설정
$ ( ".input_class" ). val ( "set input Value by class" );
//name 으로 값 설정
$ ( 'input[name="input_name"]' ). val ( "set input Value by name" );
//--Textarea
//id 로 값 설정
$ ( '#textarea_id' ). val ( "set textarea Value by id" );
//class 로 값 설정
$ ( '.textarea_class' ). val ( "set textarea Value by class" );
//name 으로 값 설정
$ ( 'textarea[name=textarea_name]' ). val ( "set textarea Value by name" );
//--Select by value
//id 로 값 설정
$ ( '#sel_id' ). val ( "s2" );
//class 로 값 설정
$ ( '.sel_class' ). val ( "s3" );
//name 으로 값 설정
$ ( "select[name='sel_name']" ). val ( "s1" );
//--Select by text
//id 로 값 설정
$ ( "#sel_id option:selected" ). text ( "select2" );
//class 로 값 설정
$ ( ".sel_class option:selected" ). text ( "select3" );
//name 으로 값 설정
$ ( "select[name='sel_name'] option:selected" ). text ( "select1" );
//--Select by index 로 값 설정
document . getElementById ( "sel_id" ). options . selectedIndex = 1 ;
//--Radio
//id 로 값 설정
$ ( '#ra_id1' ). attr ( 'checked' , true );
$ ( '#ra_id1' ). attr ( 'checked' , false );
$ ( "#ra_id1" ). prop ( "checked" , true );
$ ( "#ra_id1" ). prop ( "checked" , false );
//class 로 값 설정
$ ( '.ra_class2' ). attr ( 'checked' , true );
$ ( '.ra_class2' ). attr ( 'checked' , false );
//name 으로 값 설정
$ ( 'input:radio[name=ra_name][value=radio1]' ). attr ( 'checked' , true );
$ ( 'input:radio[name="ra_name"][value="radio2"]' ). prop ( 'checked' , true );
var radValue = "radio3" ;
$ ( 'input:radio[name="ra_name"][value=' + radValue + ']' ). prop ( 'checked' , true );
//--Checkbox
//id 로 값 설정
$ ( '#chk_id1' ). prop ( 'checked' , true );
$ ( '#chk_id1' ). prop ( 'checked' , false );
document . getElementById ( 'chk_id2' ). checked = true ;
// document.getElementById('chk_id2').checked = false;
//class 로 값 설정
$ ( '.chk_class3' ). prop ( 'checked' , true );
// $('.chk_class3').prop('checked', false);
//name 으로 값 설정
$ ( "input[name=chk_name3]" ). prop ( "checked" , true );
// $("input[name=chk_name3]").prop("checked",false);
});
</ script >
</ body >
</ html >
- copy coding -